
DIY Serving Stand for Under $12
Creating a DIY Serving Stand is easy and frugal, using inexpensive glassware from your cabinet, a thrift store, or Dollar Tree. Get creative by mixing and matching dishware for a one-of-a-kind way to display finger food at your next gathering.

Today is day two of Dollar Store Craft Week, an $1 DIY Tiered Serving Tray. I have wanted a 3-tiered stand for a long time, but I have not found one that I like or that is within a price I am willing to pay. This DIY Cupcake Stand caught my attention, but I am not a fan of the white plates. I decided that glass was the way to go.
DIY 3 Tier Serving Tray
Supplies
3 plates of choice $1 each at Dollar Tree
2 candlesticks $1 each
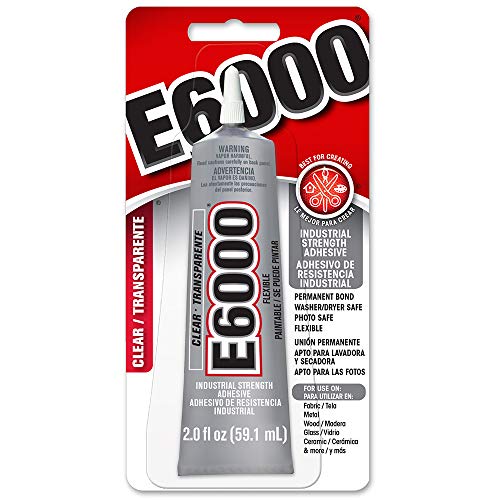
E6000 Glue $6

This is a straightforward craft to make. The biggest issue is getting the items centered while gluing.
I did not want to mark the center on the actual plates, so I made a paper template for the bottom plate. I was able to eyeball the other two due to the design on the plates.
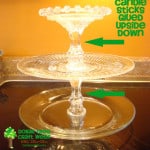
The key to this tutorial is turning the candlesticks upside down. That provides a larger surface area for cupcakes or other treats.
E6000 Glue has a very strong odor, so I suggest gluing and letting it dry outside the house. I used it out in the garage.
| Tips for Using E6000 Glue |
|---|
| -Use & dry in a well-ventilated area |
| -Wear a face mask |
| -Wear disposable gloves |
| -Let it cure for 24-72 hours |
E6000 Glue is also used for this Elevated Chip & Dip Bowl.

I just *LOVE* my stand! It looked so festive with our yummy Christmas snacks at our party on Saturday. It is washed and sitting on our dining room table now, and I smile each time I see it!

While I used mine for our Christmas party, it is excellent for any party gathering. Each stand will be different depending on the dishes you use. What special event or holiday will you use yours for?

DIY 3 Tier Serving Tray
Make a 3-tier serving stand for about $10 using Dollar Tree or thrifted glassware.
Materials
- 3 plates
- 2 candlesticks
- E6000 Glue
Tools
- gloves
- face mask
Instructions
- Wash and dry the dishware.
- Mark the center of each plate so you know where to place the candlesticks.
- Put on gloves and a face mask to protect yourself from the glue.
- Turn each candlestick over and glue in place. Upside down allows for more room on the serving tray.
- Let the glue cure for 24 to 72 hours. If you want to make sure it is properly dried, give it the full 72 hours.
Notes
Check out stands created by readers here on Pinterest. Please upload your creation so we can all see it!
Recommended Products
As an Amazon Associate and member of other affiliate programs, I earn from qualifying purchases.


Hi Dee! Thanks for asking. I just went and measured. The bottom is about 10″ across. The middle plate is slightly smaller. The top plate is about 6″ across and it’s actually a pillar candle plate. I made this several years ago so I am not if sure Dollar Tree has the same exact plates or not. You might consider a thrift store or garage sale for unique plates. Don’t forget to turn the candlesticks over for max space. 🙂
Which plates did you use from the Dollar Tree? Specifically the sizes? This looks gorgeous and is exactly what I’ve been looking for.
It turned out beautifully! I love it so much that I'm going to make one also! Thanks for the tip on how to carry it out and thanks for linking it up to Throwback Thursday!
Kim
Hi Diana! Happy New Year. I've seen these done before but you make it look so easy. I'm going to start making some of these this year. I'm featuring it at Thriving on Thursday tomorrow. Hope you'll be able to share some more of your fantastic projects again with us all this year.
Anne xx
This is such a great idea! I pinned it for future reference. 🙂
Thank you for sharing at Marvelous Mondays!
Thanks so much for sharing at Wednesday’s Adorned From Above Blog Hop!
Debi @ adornedfromabove.com
Angie @ godsgrowinggarden.com
I bought plates and candle stick holders to do this but never have yet. Looks simple.
We may have met by chance…but we become friends by choice.
http://simpleesue.com/bakin-up-chocolate-sandwich-christmas-cookies
Looks great! Especially full of all those yummy Christmas snacks!
Thanks for linking to a Round Tuit!
Hope you have a fabulous week!
Jill @ Creating my way to Success
http://www.jembellish.blogspot.com/
This is just perfect, what a great idea, local Dollar store here I come
This is perfect. I have been searching high and low for a cake stand I like, that is a reasonable price and I have had no luck. Thanks so much for sharing at my Our Favorite Things Link Party.
Hi Diana,
Thanks so much for sharing this creative project at my link party. I love the pieces you chose to create your stand, and even better that they were inexpensive. I've been wanting to try something like this for awhile and you have definitely inspired me!
Jessica @ A Humble Creation
http://ahumblecreation.com
i love it. i am taking time off tomorrow to go and get the stuff i need and make one. i cannot wait to see it for real.thanks for this great idea.
Thank you for sharing at SHOW-licious Craft Showcase! I'm addicted to Dollar Tree!!
Marti
Diana,
It turned out great. I am always looking for height on my table displays, great way to get it.
Steph
swtboutique.com
That is super impressive and I think it looks very expensive and fancy!
I love this. I want to make this! I'm inspired. In the middle of baking and shopping I love to take a few minutes to make something creative and you gave me a great new project. Thanks for sharing!
That's a great idea! Very pretty. 🙂
Marti
Great job!!! I never thought of flipping them upside down….I always do them right side up! COOL!
http://www.iheartmygluegun.com
Hello! Saw you over at One Artsy Mama and I am your latest follower. Hope you come check out my blog too! http://www.mendezmanor.com
This is great! I could make tons of these and have one for every and all season. Thanks for sharing this idea.
What an awesome idea! I believe I have just the thing for that too 🙂
This is such a fabulous food stand–I am pinning this right now! Yours is prettier than any other I've seen a tutorial for, and I love that most of it comes from Dollar Tree! Thank you for visiting my blog, and glad you enjoyed my red ice skates diy project!
Love this! You did a fantastic job on this and it's just in time for the holidays.